Hey all,
Warseer's Brimstone died this December 20th and he was a huge part of the Warhammer and Warseer community. He helped me once or twice with thread and forum problems and seemed to be a good bloke. So, if you have ever been a fan of Warseer and the people who made it what it is today stop on by at this thread HERE, and leave a comment if you wish.
I am an ardent atheist and as a result see death in a different way than most. but the recently deceased Kurt Vonnegut once wrote, "So it goes..." I feel that is a great way to express it.
Alex
Friday, December 25, 2009
Thursday, December 24, 2009
Tutorial: How I Paint Space Hulk Terminators

A slew of how-to's and tutorials coming your way this week it seems! First the part one of the Craters and Explosions (with part two later this week) and now this one. I've really been getting stuff done lately, feels good!
Now to the tutorial...
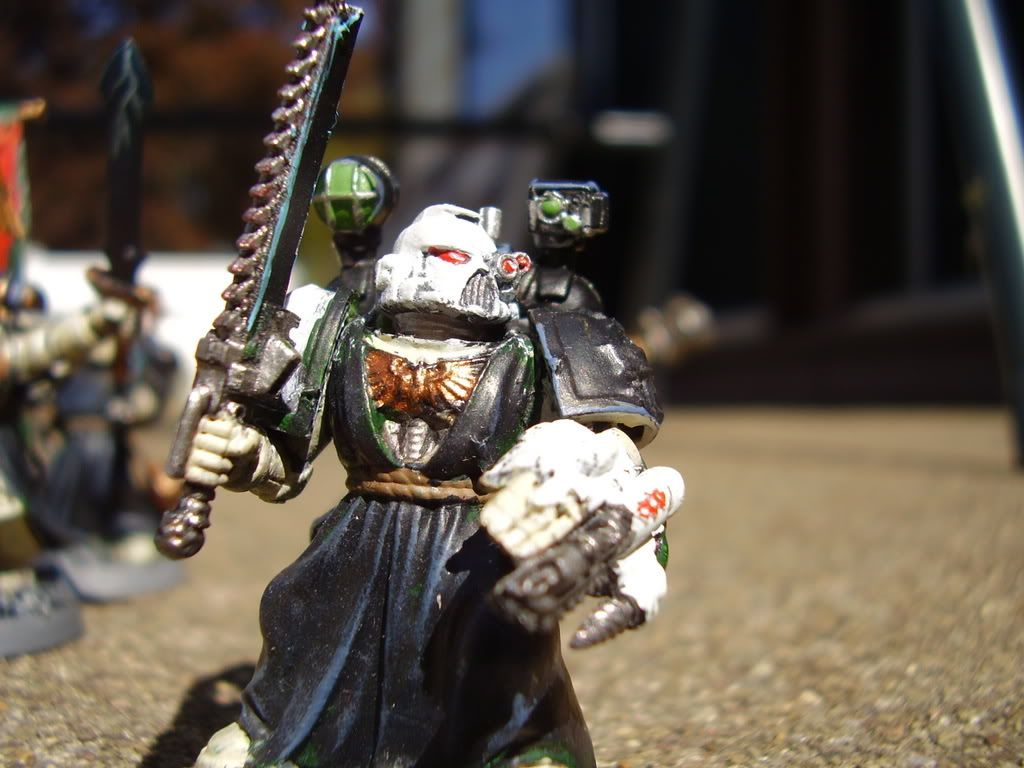
Conventional painting tutorials are generally very bland and monotonous. They attempt to show you the method of painting (which, of course, has its own merit) but most fail to explain why steps were chosen and why things were painted the way they were. Everyone has their own painting style and instead of just showing you how I paint my Space Hulk Terminators, I’ll explain why I chose the paints and techniques I did in an attempt to give you a new point of view when tackling a new mini.
First I must note that this technique was developed to be quick and conducive to bulk painting (thus the inks and washes). Anyways, lets begin!
Step one involved a simple base coat of Mechrite Red slightly watered down. Watering down your paints, especially foundation paints, is incredibly important because otherwise they will be very thick and ruin details on your model. Granted my method doesn’t really make the most of the incredible details on the models, I still urge you to water down your paints slightly. I chose Mechrite because, like all the foundation paints, it provides a very solid base color and only requires one coat.

Step two I used some Brown Caligraphy Ink and washed it over the model. Caligraphy Ink, unlike normal hobby inks, is not water proof. This means if you get water on the model, the ink will begin to run. On that same token, these inks were free because I found them sitting in my basement so I made the most of them. If you have Caligraphy inks you can counter-act the fact that it’s water-proof by mixing in some Matte Medium. I failed to do this on one of the later steps and you’ll be able to see what happens when you don’t. I chose a Brown Ink over, say, Black because Browns tend to deepen Reds more whereas Blacks tend to just dull models down.


Step three involved a drybrush of 50/50 Mechrite Red to Blood Red. This simply serves as a primary highlight.

Step four is a secondary highlight of a straight Blood Red drybrush. At this point the brightness of the Blood Red is meant to accentuate the edges and provide a nice contrast with the browns in the recesses. The armor begins to come together at this point.

Step five is a Baal red Wash. I do this to to not only blend the highlights together but also to emphasis the reds in the model.

Step six is a final highlight and is a very light drybrush of 60/40 Blood Red to Fiery Orange. This final highlight provides a noticeable contrast between itself and not only the recesses but the red of the armor itself. I wanted the models to be noticeable and eye-catching on the Space Hulk board so this highlight serves to do just that.

Now here, step seven, is where I screwed up. I apply Red Caligraphy Ink here in order to deepen the reds and give the model a slight gloss. However, I failed to mix in any Matte Medium and as you will end up seeing in step nine, the red starts to show through a bit.


Here’s where the detailing begins: step eight. I decided to paint any metallic silver parts first as that seemed to be the most prominent color on the model other than red (obviously). I used Boltgun Metal for this, but Chainmail would suffice as well.

Step nine involved base coating any gold or parchment colored surface with Bestial Brown. I decided on Bestial as it is, more or less, a bridge between Snakebite Leather (good for golds) and Graveyard Earth (good for parchments). I decided on using this middle-road color in order to maintain some uniformity over the model and helping to blend the details in a little to make them more subtle (and thus increasing the appeal of the red armor on the table). Next I drybrushed any gold surface over with Shining Gold (for obvious reasons) and then a very light highlight drybrush of 2:1 Shining Gold to Mithril Silver. This just accentuates to extreme edges producing a more vibrant gold color. The Purity Seals were simply painted in Bleached Bone with a highlight of 50/50 Bleached Bone to Skull White. I then used Black to draw small writing on the seals. Finally, over all of the gold and parchment surfaces, I applied a Gryphonne Sepia wash to them. This, like the Bestial Brown undercoat, serves to tie the different details together (and also adds a nice weathering effect to the parchment).

The final step is to highlight the gun with grey (I did a line highlight of Codex Grey with another Fortress Grey highlight just to make the gun ‘pop’ a bit more) and paint the lenses. What I did (for the eyes) was base coat Dark Angels Green, highlight 50/50 Dark Angels to Scorpion Green and finished the highlight off with a straight Scorpion green line in the front of the lens. To top it off I placed a small Skull White dot in the rear of the eye to simulate a reflecting effect that optics would have.


And that’s about it. When I finish my Genestealers (perhaps next week or so) I will post a how-to on them as well!
Wednesday, December 23, 2009
DoW2 Chaos Rising: Great Unclean One!

What a Christmas gift from Relic! A nice short little clip showing the Greater Demon that will be in DoW2: Chaos Rising... the Great Unclean One. Very awesome, even if it is brief. Funny as hell too :D
Monday, December 21, 2009
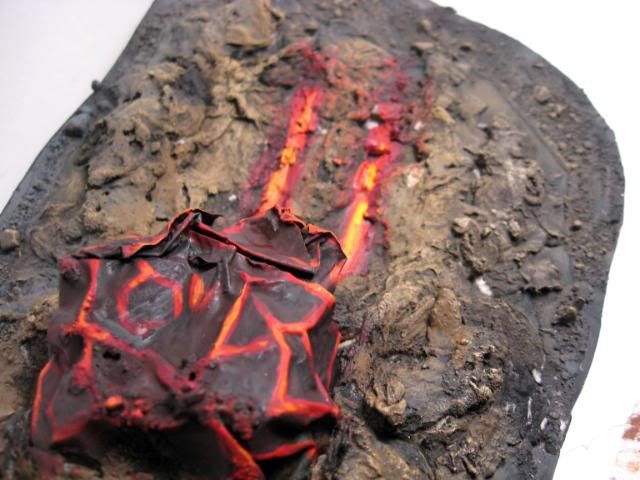
Tutorial: Craters and Explosions (Part One)
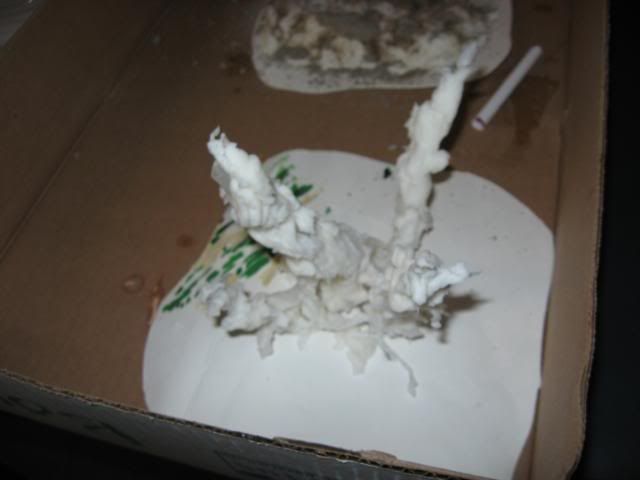
So here is a very simple method to create craters and explosion effects. I do warn you, though, the tissue paper takes FOREVER to dry completely so if you need a piece of terrain immediately, look elsewhere. Otherwise if you have about ten or fifteen minutes to kill in a day and don't mind leaving it to sit for a few days, this method is ace.
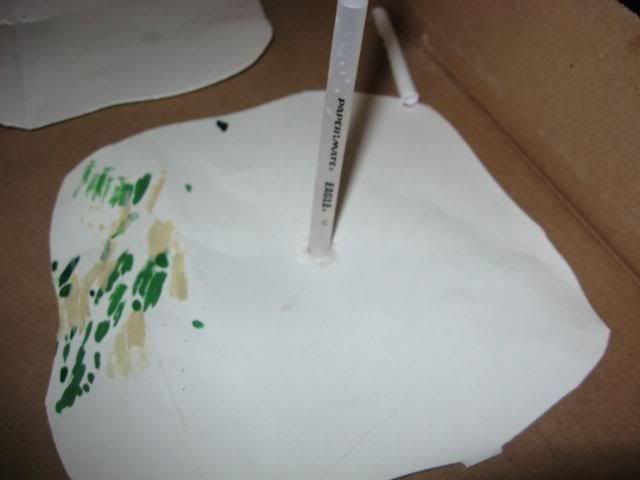
Step one, cut out a frame. It can be anything. I suggest foamcore, but I use posterboard here. You're just using it so you can place the wet paper down and be able to move it around so the material isn't a huge deal.
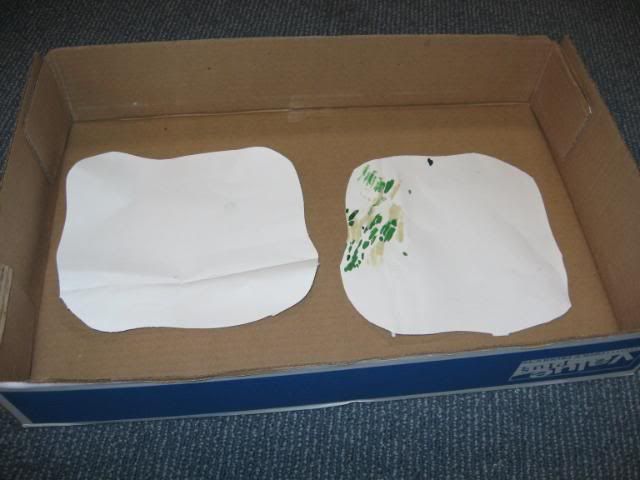
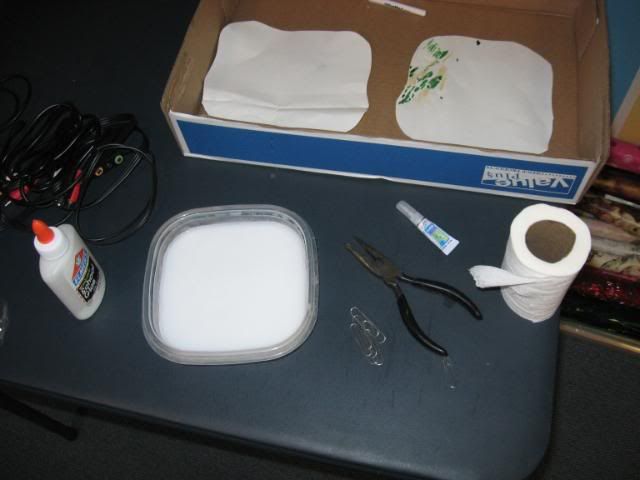
Step two is to mix some Elmer's Glue with water (it should be mostly water. I'd say about at least 5:1 water:glue)and gather your materials. I have my paste mix, some Toilet Paper, some paper clips, an old pen shell and some super glue.
CRATER
First I'll start with the crater. Simply tear of lines of toilet paper, dip in you paste substance, and create a circle with them on your base. Be sure to slope the outer edges!
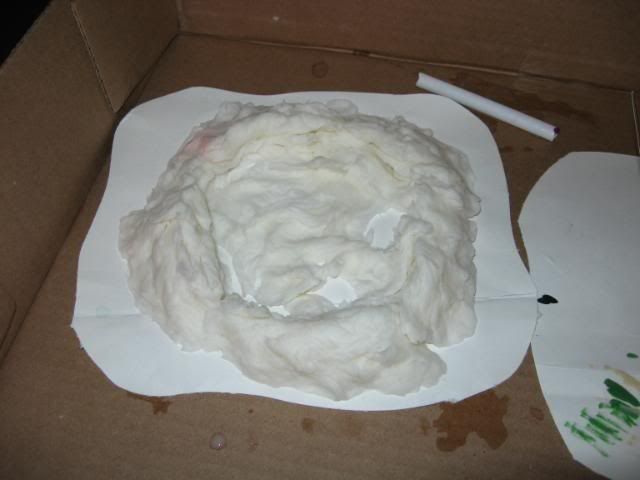
Next, if you want, sprinkle on some sand to give it an extra texture.
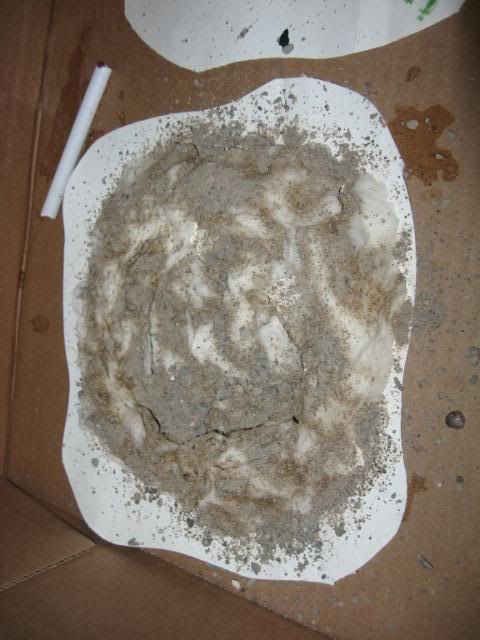
Bam! Done with the crater construction. Now onto...
EXPLOSION
First glue your pen shell upright. This will be the main debris flying from the impact of the exploding shell on the ground.
Next, bend your paperclips and glue them around your pen shell. These will be the debris strands flying outward from the center of explosion.
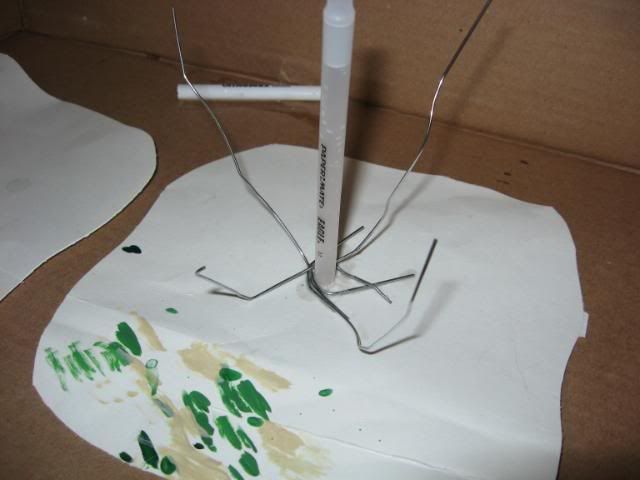
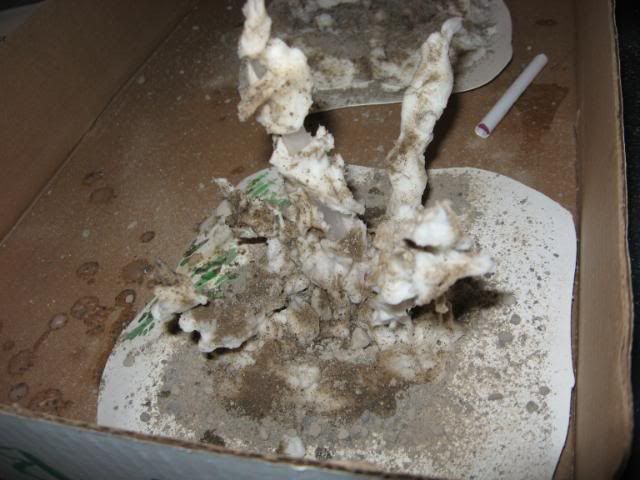
Now dip small strands of Toilet Paper into your paste substance and begin to wrap it around each debris strand. Make sure you fiddle with it to make it look chaotic (like an explosion) and be sure if you have any loose strands that they point up in the direction of the debris. It is inevitable that some will fall off and some will need to be adjusted, but if you are patient it's not a big deal. The beauty of the long dry time of this paste is that it directly results in a longer work time meaning you can change anything you want for a long time after the original build.
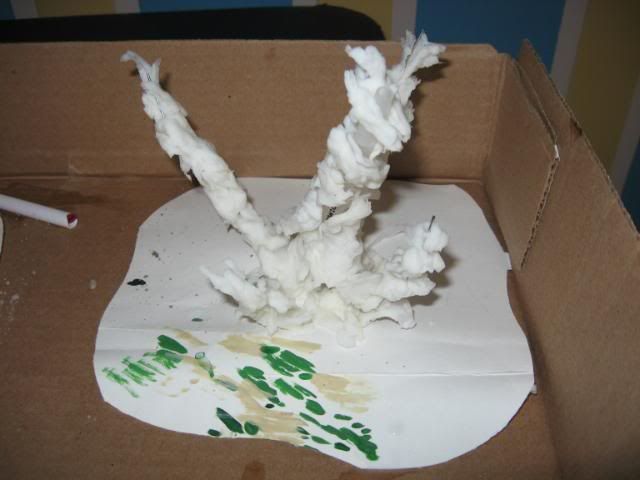
The next step i don't have a picture for, but just like the "Crater" part of this tutorial, create a small crater directly around the debris strands. It will produce an effect as if a shell just hit the ground causing a crater and all the crap flying upwards is the displaced ground.
Now sprinkle sand on it. This will further add to the effect of ground being blown upward.

Part Two can be found here!
Step one, cut out a frame. It can be anything. I suggest foamcore, but I use posterboard here. You're just using it so you can place the wet paper down and be able to move it around so the material isn't a huge deal.

Step two is to mix some Elmer's Glue with water (it should be mostly water. I'd say about at least 5:1 water:glue)and gather your materials. I have my paste mix, some Toilet Paper, some paper clips, an old pen shell and some super glue.

CRATER
First I'll start with the crater. Simply tear of lines of toilet paper, dip in you paste substance, and create a circle with them on your base. Be sure to slope the outer edges!

Next, if you want, sprinkle on some sand to give it an extra texture.

Bam! Done with the crater construction. Now onto...
EXPLOSION
First glue your pen shell upright. This will be the main debris flying from the impact of the exploding shell on the ground.

Next, bend your paperclips and glue them around your pen shell. These will be the debris strands flying outward from the center of explosion.

Now dip small strands of Toilet Paper into your paste substance and begin to wrap it around each debris strand. Make sure you fiddle with it to make it look chaotic (like an explosion) and be sure if you have any loose strands that they point up in the direction of the debris. It is inevitable that some will fall off and some will need to be adjusted, but if you are patient it's not a big deal. The beauty of the long dry time of this paste is that it directly results in a longer work time meaning you can change anything you want for a long time after the original build.


The next step i don't have a picture for, but just like the "Crater" part of this tutorial, create a small crater directly around the debris strands. It will produce an effect as if a shell just hit the ground causing a crater and all the crap flying upwards is the displaced ground.
Now sprinkle sand on it. This will further add to the effect of ground being blown upward.


Part Two can be found here!
Sunday, December 20, 2009
METEORS!!!
So I found an awesome video tutorial on Miniwargaming about crashed Asteroids
and decided to give it a go myself! This is what was produced:
I am honestly so happy with the results that I'm doing a tutorial on craters and explosions using this same method which will be posted up later in the day on Monday with Part Two following whenever the damned stuff dries!
I think it looks cool, what about you guys?
and decided to give it a go myself! This is what was produced:


I am honestly so happy with the results that I'm doing a tutorial on craters and explosions using this same method which will be posted up later in the day on Monday with Part Two following whenever the damned stuff dries!
I think it looks cool, what about you guys?
Thursday, December 17, 2009
Director speaks about Ultramarines movie
I must say, this gets me excited for the prospects of this movie. Like the previous interview with Abnett these guys are trying to stress how important it is to live up to the fan's expectations and deliver a movie that feels authentically 40k . Should be great.
Sunday, December 13, 2009
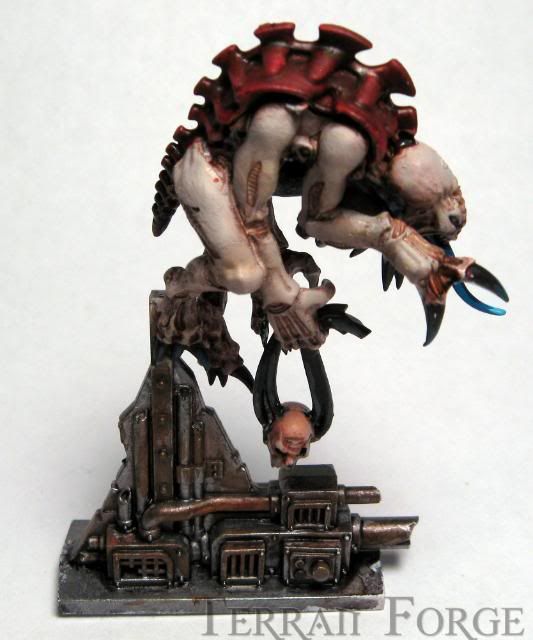
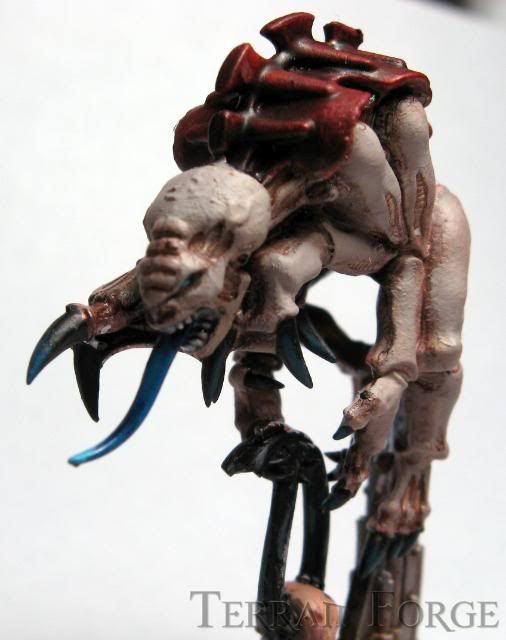
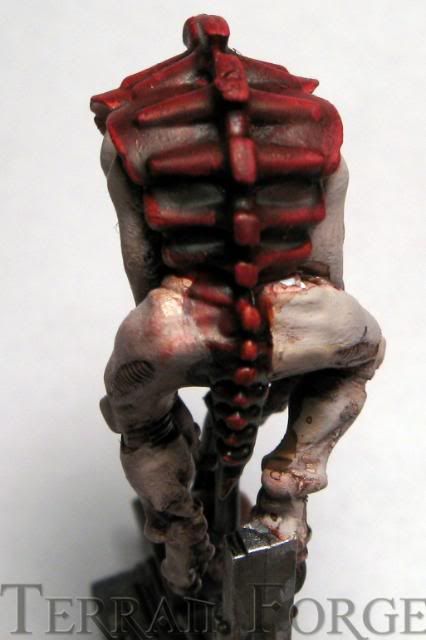
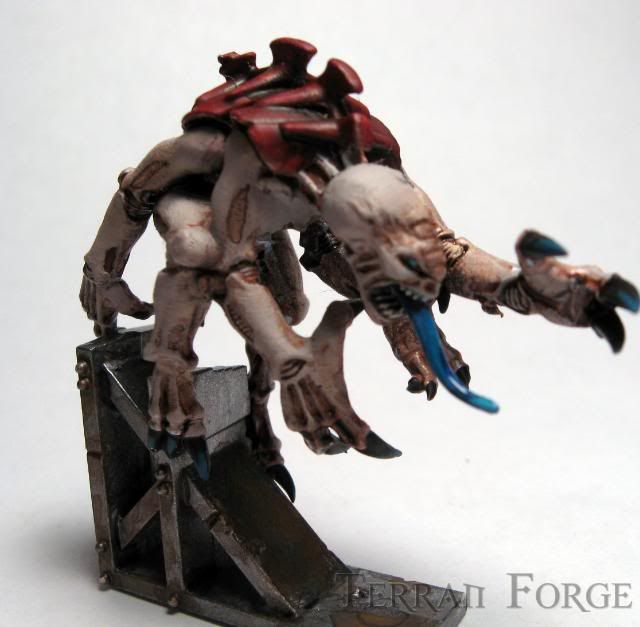
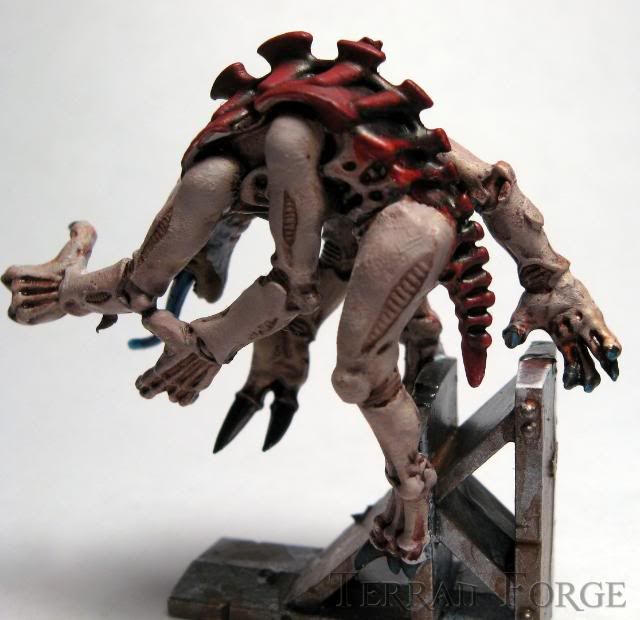
Paintin' Up Space Hulk: Genestealer Test Batch
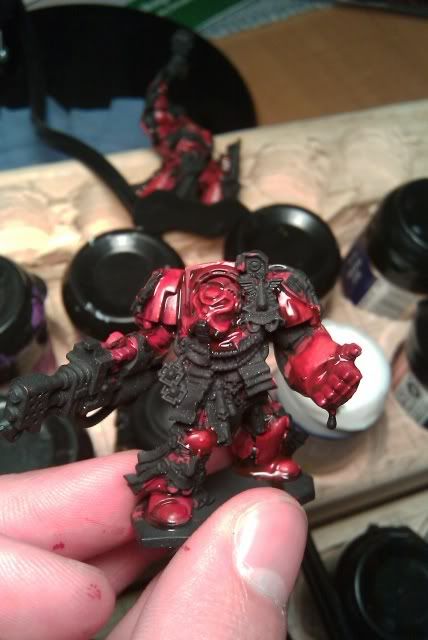
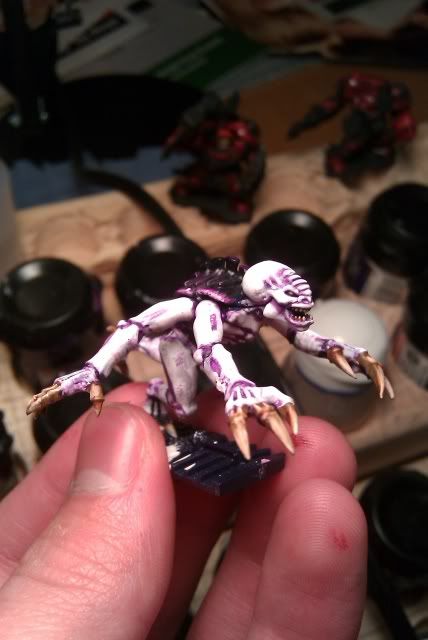
Finally found some free-time and the motivation to paint some 40k, and two Space Hulk Genestealers are what were produced. In my earlier Space Hulk post I had a Leviathan theme, but the method I had was just not as effective nor fast enough for me to want to continue it. So I started from scratch and came up with this theme which was fast and painless. Normally I'm not into speed-painting or anything, but when it comes down to it, I just need some table-top quality models to make Space Hulk more visually thrilling and that's what I'm doing. All but two of my Terminators already have their armor painted red and it's only a matter of time before i finish them (though I want to put the base coats on the 'Stealers first just when Pat or Alex and I play a game it'll look at least semi-decent). Anyways, here's the pics, let me know what you think!


Monday, December 7, 2009
Astro Mag: Help 'em out!
For those of you not familiar with The Astro Mag, it's a quarterly 40k e-zine started by myself which I lead for five issues until real-life kicked in and I stepped down after Issue 5 in July. Since then there have been a number of hiccups in Issue 6 and Consadine, who is now the head-honcho of the Mag, has decided to wait for a January release in order to shove more articles in and get some Christmas-y stuff in.
So why am I posting this?
Consadine and the guys are looking for more articles, pictures, artwork, comics, whatever to make Issue 6 the most epic of 40k e-zine issues ever! If you have ANY tutorials, editorials, critiques, home-brew rules, cool pictures (especially 40k-related Holiday pictures!), artwork or whatever that you would like published in the mag and read by 10,000+ hobbyists just email them to theastromag@gmail.com! It's really that simple. The idea I started and left behind was to make this a strictly 40k-online-community run magazine. Sure, only a handful of people are responsible for the final product, but all the articles come from various forums and blogs submitted by hobbyists or requested of outstanding hobbyists. The magazine literally happens because of you! If you have any questions about the mag or submitting stuff, you can either drop a comment or email me.
Also, don't forget to check out the Astro Mag's blog to make sure you're up to date on what's happening!
-Kevin
(Side note: I've been working on my Space Hulk stuff again. Hopefully I can get some stuff done before Winter Break so Alex, Pat and I can have a colorful game of Space Hulk!)
Saturday, December 5, 2009
40k/Blogging Desktop Wallpapers
So yesterday I was doodling in my notebook during a two-hour Calc lecture and got a cool idea for some Desktop Wallpapers. Since I'm at home for the weekend (I was dragged home by the girlfriend for a party yesterday) and don't have my codices with me, I decided this would be a nice filler for my Army Mojo stuff until I get the Tau army list up next week.
So first I made a Terran Forge Wallpaper which, admittedly, I'm not too fond of. I'll end up redoing it eventually to make it look less crap. Then I contacted Ron at From the Warp to make sure I could use his logo and, with his blessing, created a cool FtW Wallpaper.
Here they are, and at the top of the page there is a link to "Wallpapers" which will be updated as I create more over time. I am definitely going to do an Astro Mag one and if you guys have any suggestions just let me know!
From the Warp

Terran Forge

Tuesday, December 1, 2009
Mojo List #3: Imperial Guard
 Ok, as I'm getting back into the swing of things at school I'm starting to free up some time for 40k and the first thing is list number three for the Army Mojo series, Imperial Guard! I remember when the codex came out not too long ago, Alex and I poured over it and looked for really cool things you can do. Here is, what I believe, would be a very effective list:
HQ
Company Command Squad - 150
+Carapace Armor, x3 Plasma Guns, Medi-Pack
Elites
Psyker Battle Squad (x10) - 180
+Chimera Transport with Extra Armor
Troops
Infantry Platoon - 230
- Platoon Command Squad (x5 Close-Combat Weapons and Las-Pistols)
- Infantry Squad 1 (Grenade Launcher, Mortar)
- Infantry Squad 2 (Grenade Launcher, Mortar)
- Infantry Squad 3 (Grenade Launcher, Mortar)
Veteran Squad - 185
+Grenadiers, x3 Melta Guns
+Chimera Transport
Veteran Squad - 185
+Grenadiers, x3 Melta Guns
+Chimera Transport
Heavy Support
Leman Russ Battle Tank Squadron (x2) - 320
+x2 Heavy Stubbers
Basilisk - 125
Basilisk - 125
Total = 1500pts
------------------------------------------------------------------
The idea behind the list is to totally neutralize the enemy by pinning and constant morale checks. The Basilisks and Mortars pound on infantry squads to try and pin them or force them to fall back with the Psyker Battle Squad zipping around the field lowering leaderships to make the former squads' tasks easier. The Veterans have a pretty clear objective: tank-hunting and late-game objective grabbing. The Battle Tanks provide some more pie-plate support and can act as barriers to protect the considerably weaker Basilisks. The idea behind the Company Command Squad is to take full advantage of their BS of 4 by providing deadly mid-range fire-power while staying in range of the infantry squads (allowing orders to flow smoothly as well). The Medi-Pack and Carapace give the squad extra survivability as they will have a 4+ armor save plus a FNP save. Finally, the Platoon Command Squad is equipped as a defensive mechanism. In case a deadly close combat squad is closing in on the mortars, they can throw themselves into the fray to protect the troops for at least one more turn which can be invaluable.
So what do you guys think? The lack of mobility in the Infantry Platoon should be sufficiently counter-balanced by the high chance for pinning and the three Chimeras annoying the enemy's front-line. Next up is Tau!
Monday, November 30, 2009
At My Worst
Ron asked all the From the Warp members to send them a description or link to a post about the worst of our modeling/painting endeavors. I am doing the latter.
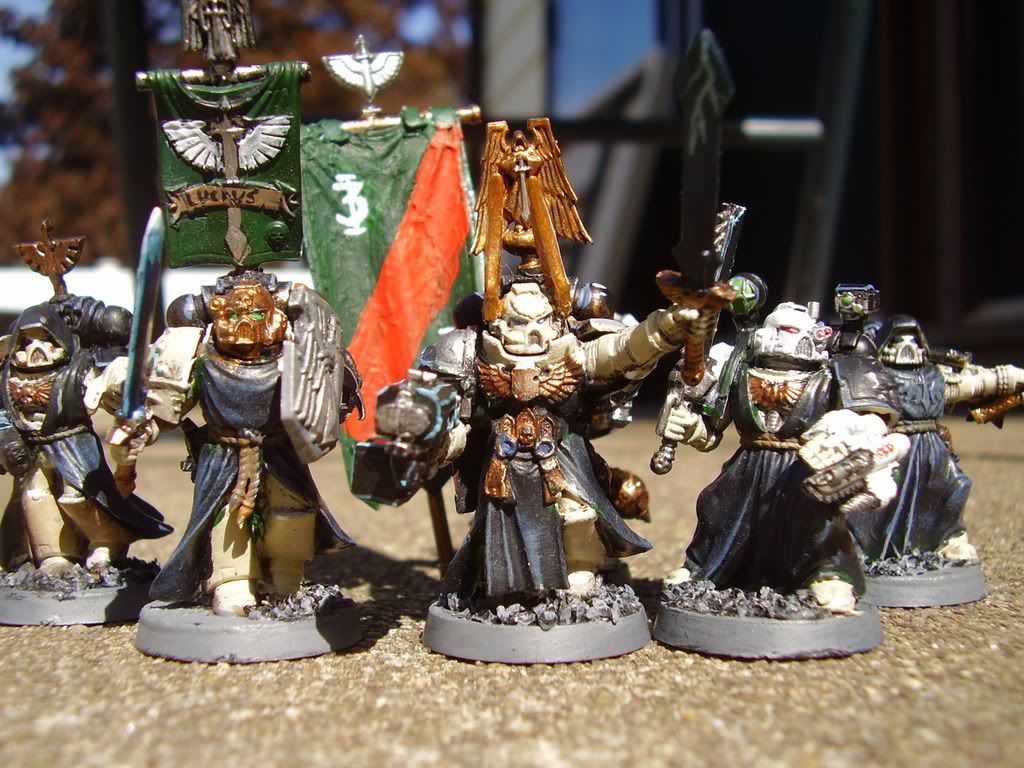
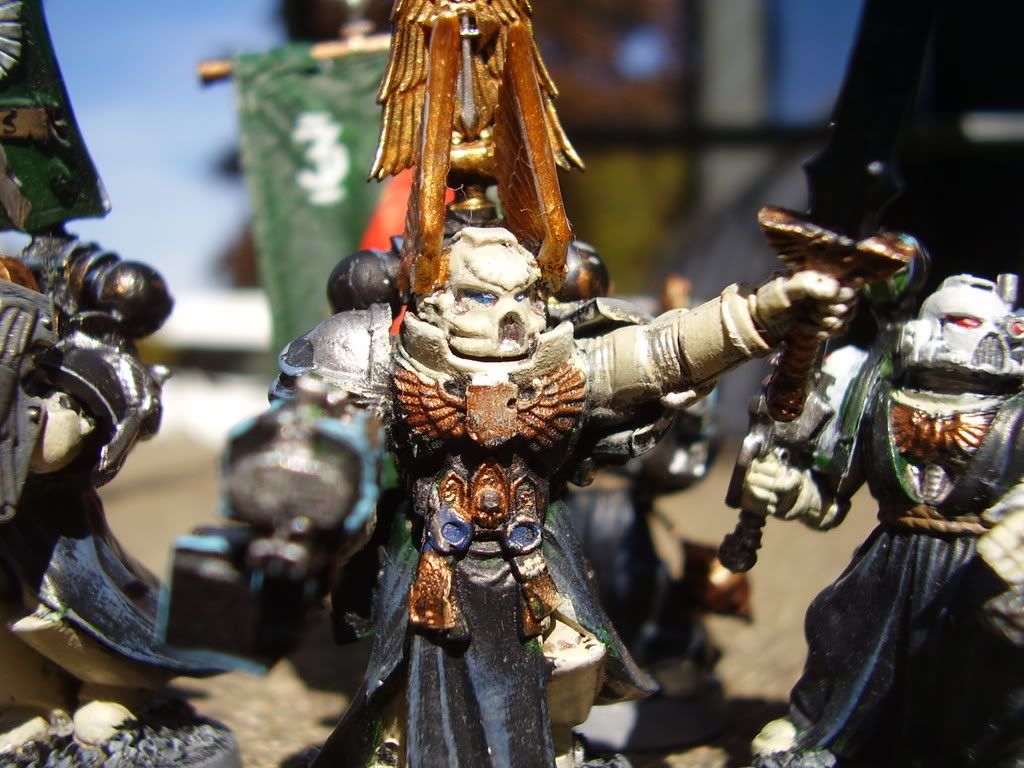
When I first started the hobby (not too long ago, admittedly. Bought my first box in March of 2007) I played an Angels of Absolution army (an off-shoot of the Dark Angels). Bone, as I quickly discovered, wasn't the easiest nor fastest thing to paint. At times I would be very patient and be able to add depth to models to make them at least half-way decent and at others I would just want to paint them and forget them. One such example is my old Company Master and Command Squad. Back then it didn't seem so bad, but looking at them in my figure case I always think to myself "What the hell was I thinking when I painted this squad?!"
And here that squad is:
It's kind of uplifting to look at these pictures because to think that in just a few short years I was able to up my skill from that squad to a something like my Khan model and my Golden Demon finalist Commissar!

Friday, November 27, 2009
Some Space Hulk WIPS
So I finally started painting a bit again after a game of Space Hulk re-invigorated me. Here are two termies and a genestealer still in their pip stage. Pics taken with my new droid eris phone so not sure how good the quality is.


Wednesday, November 25, 2009
GW Intellectual Property Infringement
Hey everyone,
I just got home for my Thanksgiving break tonight and was browsing the interwebs when I came across this digg'd article (it was also on 4chan).
http://digg.com/comedy/Terrible_band_is_terrible_at_photoshop_steals_logo
Other than being a poor album cover in my opinion, the band took a copy righted IP of GW and mythic (Not the chaos star, but the eye of tzeentch).
I will not share my opinion on the issue until I see some more discussion on it in the comments, but I have a feeling the community feels strongly about this regardless.
Discuss!
Sunday, November 22, 2009
Mojo List #2: Chaos Space Marines
 First off, I apologize for the delay in this list. I had my finals this week plus I came back home for the short break I have PLUS one of my dad's best friends died of Lung Cancer last night (a non-smoker, believe it or not) so to say I've been busy would be an understatement. I've also been playing the game Dragon Age: Origins in the little free-time I've had (the story is great, but I'm not a fan of the gameplay. Not a huge RPG fan as it is though).
Anyways, I digress.
Here is list number two, the Spiky Marines... er, Chaos Space Marines :D
HQ
Demon Prince - 175
+Mark of Nurgle, Wings, Warptime
Troops
Chaos Space Marines x10 - 255
+ Icon of Nurgle, x2 Melta Guns
-Rhino
Chaos Space Marines x10 - 255
+ Icon of Nurgle, x2 Melta Guns
-Rhino
Plague Marines x10 - 290
+ x2 Melta Guns
-Rhino
Heavy Support
Chaos Defiler - 150
Chaos Defiler - 150
Obilterator Cult x3 - 225
Total = 1500pts
------------------------------------------------------------------
The basic premise of the list is rather easy to figure out at first glance. You have your Troops zoom forward in Rhinos with the Defilers using their Battle Cannons to pound the enemy from range. Given that there are two icons in your army, you can effectively have a 24" no scatter zone for your Obliterators, allowing ideal placement for maximum... obliteration. I'll be honest, throwing Obliterators into the list is still something I'm a bit iffy on, but they are very powerful, relatively resilient and rely on shooting out of deepstrike instead of assaulting. On top of that, they have a wide array of weapons to choose from each turn allowing for them to be a squad you can tailor each turn. My idea is that it will take care of the tanks that the Troops with Melta Guns could not. If any threatening armor is taken care of, they could deal with infantry rather easily.
The Troops themselves are just meant to be annoying. Thirty T5 guys with a total of 6 melta guns can ruin anyone's day. But what do you shoot? Do you target the Plague Marines? Well they're harder to kill because of FNP. Do you target the regular troops? They are the easiest to kill thing in the entire army. But if you focus on them, what about the Defilers, Obliterators and the nasty Demon Prince breathing down your neck? No matter what you choose you will always be in a tough situation. This helps the CSM player since his battlefield plan is far more malleable than most. You have resilient troops that can easily hold objectives, a Demon Prince that can make short work of any squad you through at it, Obliterators that, while vulnerable to Instant Death, can destroy tanks or infantry without even a thought and finally two Defilers that are nasty at range and assault.
However, the biggest weakness of this list is that it relies on getting close to the enemy fast. If the three Rhinos are immobilized or, Khorne forbid, destroyed then the Obliterators will be in a difficult position when they become available as they will have inadequate support on the front line and your Demon Prince will be all alone, yet still providing a juicy target that may draw fire away from your precious troops.
Of course, the biggest strengths are that it can deal with Mech lists and MEQ lists quite easily as well as being a great list to hold objectives and unyielding on Kill Points (T5 is nothing to scoff at).
So what do you guys think of it? I especially would like to hear your thoughts on Obliterators as I am not 100% on them in this list, but definitely see potential. Whenever I have faced this unit on the table, I've seen mixed results.
Monday, November 16, 2009
Mojo List #1: Witch Hunters
 I lied! today is only Monday, but I finished the first list (while studying for my Calc exam that's in about an hour and a half, naturally). Well, the first Army List for my Mojo series is here! I was utterly surprised, and somewhat excited, to see that Witch Hunters took the top spot. This is an army I know very little about (since I face them the least) and it was incredibly fun reading through their codex and creating a, what I consider, good list using my general "Army Mojo" principles. I decided to set a point limit at 1500 for all lists, as it really forces you to think about every choice and isn't entirely conducive to downright unit spam. So here is the list, and after I will describe why I picked the units the way I did.
HQ
Canoness - 139
+ Bolt Pistol, Eviscerator, Frag/Krak Grenades, Rosarius, Jump pack
Elites
Repentias - 210
Troops
Battle Sisters Squad - 179
+ Flamer, Melta Gun
+ Rhino Transport (Smoke Launchers)
Battle Sisters Squad - 179
+ Flamer, Melta Gun
+ Rhino Transport (Smoke Launchers)
Battle Sisters Squad - 179
+ Flamer, Melta Gun
+ Rhino Transport (Smoke Launchers)
Fast Attack
Dominion Squad - 221
+ x2 Flamers, x2 Melta Guns, Frag Grenades
+ Rhino Transport (Smoke Launchers)
Seraphim Squad - 227
+ Hand Flamer, Inferno Pistol, Frag Grenades, Krak Grenades
+ Veteran Sister Superior with Bolt Pistol and Eviscerator
Heavy Support
Exorcist - 135
Total = 1499pts
------------------------------------------------------------------
So the basic idea behind this list is to be able to get up close quickly. Every unit is capable of moving 12" in a given movement phase, only the Repentias are limited to 6" (and even then, if the roll a 1 or 2 they will move 6+D6"). It is a fast list. For obvious reasons, the jump-pack Canoness will be attached to the Seraphim squad allowing for a pretty potent close-combat squad as there are two Strength 6 Power Weapons in that squad, plus twin-linked flame pistols and twin-linked inferno pistols (Strength 8, AP 2). The Repentias are also very good in close-combat since each of them have Eviscerators and the Repentia Mistress as a Power Weapon that adds one to her initiative.
Now each Battle Sister squad has a flamer and melta gun. As I mentioned in my Space Marines, Jacked post, is something I am fond of. It allows tactical flexibility on a unit scale rather than on an army scale. Personally, I find it more fun and useful but that comes down to my style of play, though I highly recommend trying it out. Anyways, each Sister squad is capable of taking down hordes or tanks given the situation. Not only that, but using the Rhinos, you can effectively create walls that bottleneck enemy troops, allowing you to pick them off much easier.
The Dominion squad was chosen with the same idea behind the Battle Sister squads, but I get double the special weapons. They will be most useful in a situation where I need more anti-horde power or more anti-tank power so, effectively, they play a support role (in that they'd be supporting the Sister Squads in a situation).
The Seraphim and Repentia squads are there to keep the Sister squads alive as they whittle down the enemy with fire (quite literally) and to take down threatening long-range units or to tie up threatening close-combat units. Either way, I feel that they would do very well on the battle field.
The Exorcist has the simplest role, it is to provide long-range anti-tank (or anti-high toughness) support.
Now I have played against Witch Hunters a handful of times, and never a "pure" force (there were always Guardsmen, Grey Knights, etc. in their lists). I am interested to here your thoughts on this list, especially those who play against Witch Hunters more often or play with them occasionally! Is this a good/decent list? Is it total crap? Let me know why- the more knowledge we can pack into these lists the better!
COMMENTER NOTES- From Blaine: Exorcists aren't the best choice because one weapon destroyed result puts them out of the game, while Immolators still have what's inside. [About Repentia Squads] I 1? T 3? a 4+ save and 20 points per models does not make for something that will live very long at all. In CC everything will go before you, if you even make it there. Imagine what a AC/HB Predator would do to this squad, or a Devastator Squad full of Heavy Bolters...
Sunday, November 15, 2009
List Lineup
Well, poll is closed and removed (taking up too much space). So here is the lineup with how many votes they received in parenthesis (for ties I choose the order)
1) Witch Hunters (12)
2) Chaos Space Marines (12)
3) Imperial Guard (11)
4) Tau (9)
5) Chaos Demons (8)
6) Black Templars (8)
7) Space Wolves (8)
8) Eldar (forgot to add them into poll, so they'll go here)
9) Space Marines (8)
10) Demon Hunters (7)
11) Tyranids (7)
12) Dark Angels (6)
13) Orks (5)
14) Dark Eldar (3)
15) Necrons (2)
16) Blood Angels (2)
I will try to post one every two to four days, but it depends on my schedule. I may push Tyranids back a bit just because they'll be getting a new codex in January, but it depends on whether or not I'll be able to get my hands on the codex. We'll see.
Anyways, expect the first list on Tuesday!
Thursday, November 12, 2009
Chaos Rising Video and Army List Poll
First, the poll...
So for those of you that have been following the Army Mojo posts, this may be old news...
I will be creating an army list for every playable race in 40k. There is a poll to the left that will close Saturday night- just pick the four you want me to write a list about first and those will be it. If there's a tie, I get to pick the order of the winners :)
Now as some of you may have noticed, in my haste I forgot to include Eldar... whoops! I will add them in about middle of the road when I'm posting the lists and my many apologies to you Eldar players!
And now the Chaos Rising Video, posted on Gamespot yesterday. I can't freaking wait for this game (March '10!)
Wednesday, November 11, 2009
Army Mojo: Heavy Support
 And the last installment of the Army Mojo series… kind of. In the coming weeks I will be posting an army list for EVERY playable army using the general ideas that have been posted in this Army Mojo series. It should be fun for me to do but more importantly it should serve as a great example for how you can use these ideas and apply them to a list. Without further adieu, here’s the Heavy Support article…
Heavy Support tends to, obviously, be your support element in an army. Whether they’re tanks, powerful shooting units, ordnance or what have you, they help to put the hurt on an enemy at long range. Without long-range and steady support, your fast-paced army will get rocked by some pill-box tank sitting in a well-protected corner. It is crucial to have some long-range support element in your army to provide a softening “first-punch” before your fast and elite portions of your army get up close and most of the time this element will come from the Heavy Support slot.
Ordnance is incredibly useful on a battlefield (ask any Imperial Guard player) and if you have a viable option, it tends to be very wise to take it. Even if it isn’t all that powerful (Space Marine Whirlwind, for example) it can still dish out the hurt and force your opponent to spread his troops out which could potentially deny cover saves if you position your other troops correctly. Just the knowledge that your opponent has a tank that dishes out a 5” pie-plate is an advantage against most players. Plus, if this tank can dish out Strength 8 and above and AP 3 and below, expect a lot of mayhem to be had! Of course there are also the pill-box type tanks like Space Marine Predators. Not exactly the strongest tank in the bunch, but they can certainly hold their own positioned correctly and can dish out some nice damage. Infantry-wise, it all depends on your list and if you are comfortable playing with them. Heavy Support infantry can be tough to use in some lists since most of the times they’ll be the only infantry unit you have sitting back and shooting and thus they’re vulnerable. However, in the right hands they can be very useful, it’s just necessary to know the weaknesses of the unit even more than the strengths so you can keep them alive.
ADDENDUM: From Silent_P on the Astronomican Forums:
Artillery is designed to do two things. First it is utilized to soften up your opponent. Dishing out templates and blowing holes in the opposition's line will give your army the flexibility and room it requires to maneuver. Second, your artillery has the ability to help control the pace of the battle. By pinning enemy units you are allowing your own army to move that much faster. Converse to that, by shelling your opponent as he comes marching towards you forces him to speed up his movement. He can't pause to shoot at your own line because he knows the next round a pie-plate is going to be landing on his unit. In my opinion half of the battle is already won when you begin taking elements of control out of your enemy's hands. The biggest trick of the matter is keeping your heavy artillery alive while sneaky enemy units attempt to neutralize them.
Choosing Heavy Support units comes down to, you guessed it, what role they’ll play in the army. This MUST, MUST, MUST be determined while making your list, otherwise I can guarantee the tank will be in the wrong place at the wrong time. Now if you make the tank versatile, just be sure you play it correctly. You need to know what is more of a threat to you and what you will have a better chance killing. If there’s a Land Raider in front of your Autocannon/Las Cannon sponsons Predator and a Dreadnought next to it, be damned sure you’re shooting that Dreadnought as you have far better chances of killing it than a Land Raider even if that is more of a threat at the moment. With versatile units it is incredibly important to understand the difference between immediate threats and real threats, but that’s a different article for a different time.
The thought process for Heavy Support is very similar to Elites. It all comes down to play style, unit preference, skill and how that unit will be a cohesive element within your army.
Well that's it for the article portion- now to put it to the test! Besides wanting to hear your thoughts on comments on this list, I want to know what army you think I should make a list for first so make sure you vote for your four army choices on the left hand side of the page!
Monday, November 9, 2009
Army Mojo: Fast Attack
 Fast Attack happens to be a FOC slot that many armies either take full advantage of, or they don’t even tough it. This has everything to do with what your list looks like and how you plan to play said list. Fast Attack units usually can be separated into two sections: close combat and guerrillas. In reality, you kind of want to think of all (well, nearly all) Fast Attack choices as guerrilla units. They excel at attacking swiftly, and then finding protection or attacking swiftly and hope they did enough damage that they don’t die next turn. I’ll separate these off and talk about both.
Close Combat
This, generally, is where you see the bulk of Fast Attack choices on the table falling under. For obvious reasons, their specialty is close-combat. However, these units are also generally less powerful in hand-to-hand than an Elites choice that would be chosen for the same purpose. However, what they lack in power they make up for in speed. A Fast Attack infantry unit will, in most cases, have an 18” assault range (either 12” or 6” for movement and 6” or 12” assault). This enables them to get into combat earlier, and thus neutralize a potential key unit on the enemy team. A good example of where this is useful is if you are a Space Marine player with an Assault Squad. Your enemy is playing as Eldar and they have a Dark Reaper team hidden in some cover. Attempting to out-shoot these units to death can be costly since you are sacrificing shots that could be used to take down assault units such as Howling Banshees and you have a very low chance of killing them as you are against a 3+ armor save plus a probable 4+ cover save if you happen to be shooting with AP2 or less weaponry. However, if you are able to Assault these Dark Reapers, you neutralize their strength (killing marines with their AP3 guns o’ death) and simultaneously take advantage of their weakness which is close combat. This idea can be applied to many more similar situations and is how you tend to see Fast Attack close combat units played.
Guerrillas
This particular division of Fast Attacks, while still applying to the Close Combat division somewhat, takes the most advantage of the biggest strength these units have: speed. No matter what your Fast Attack choice, if you are not darting around the field every turn, you’re doing something wrong. This applies even more for Guerrilla units as their mission is to get in, put the hurt on, get out. It’s a cat-and-mouse like game where you are the mouse that’s toying with the cat, but hiding just well enough so the cat can’t get you back. It’s all about positioning both your unit and the rest of your army. Guerrilla units never (or, well, rarely) succeed on their own. They rely on other units providing just enough distraction to the enemy to make him question what is more effective to destroy, the guerrilla unit or the other dangerous elements of your army? Not only that, but the other units often provide passive protection for the guerrilla. How? Well if you are able to position your unit correctly, the enemy will be in a lose-lose situation. If he kills the guerrilla he will end up getting shot to pieces or eaten up in close combat by another unit, however if he kills those units the guerrilla will be free to roam and wreak havoc elsewhere. It is a very frustrating situation for your opponent, and one that will be advantageous to you no matter what he chooses.
In closing, Fast Attack units have one general strength, and that’s speed. If you are not constantly taking advantage of this or your list isn’t able to provide enough protection and support for these units you need to either re-think your list or just ignore Fast Attack altogether. After all, they’re not for everyone.
Only one more section to go, Heavy Support! What are your thought not only on this section, but all of the rest? Is this shaping up to be a useful article series?
Saturday, November 7, 2009
Army Mojo: Troops
 Ah, troops. The centerpiece of every army (thanks to the FOC). Most of the time people will choose troops that are cheap and fit in their list just so they can add more Hammer units (as mentioned in the Elites Mojo post) to pound the ever-living crap out of the other army. While this tactic can be great (not so much for the opponent though) giving thought to what Troops you are choosing can be even more valuable. Fifth Edition, as we all know, pushed the emphasis on Troops more than ever because only they can capture objectives. When the rulebook first came out many lists just started to Troop-spam which, as they found out, wasn’t a great idea. When you take too many troops (this is not true for some armies but is an apt generalization) you tend to weaken the potential of your list. When you take too few troops you risk doing the exact same thing. Well, then, where’s the balance? That’s not a question that has a single answer. Like everything in your list it depends on the purpose and how the troops will be cohesive with your army. If you haven’t noticed yet, cohesiveness is a MASSIVE part of list building and the more you recognize how one unit performs alongside another, the sooner you will be able to create a perfect list for your needs (remember, though, list building is only a small part of playing games. Experience and generally good tactics are far more important, but a good list helps compliment those two things).
Most basic troops are pretty mediocre. They don’t have the muscle that Elites do, they don’t have the speed the Fast Attack units do and they don’t have the fire power that Heavy Support has. Why on Earth would you ever take troops? Well they are the backbone of your army. Sure, they may not be as powerful as Unit X or Unit Y, but their skill lies in their versatility. For example, I can make a Guard squad anti-tank by giving them a Melta gun. Boom goes the dynamite. Obviously that’s a simple example. Now something I like to do with my lists (that many people will cringe at) is throwing an anti-tank and anti-infantry weapon into each of my Tactical Squads. Sure, I kind of go against the “what is the purpose of this unit” rule but it allows for massive tactical flexibility on the table so every squad can fill any role that’s needed based on the situation. This is something that I feel Troops choices excel at. They have a great ability to be flexible on the unit-based level so depending on what type of game you’re playing and what type of list it is, you can always fill a needed role. What some people will claim is that if I have a Melta Gun and a Heavy Bolter in my squad and I’m shooting a tank, that Heavy Bolter is going to waste. They’re right. But so do the eight other Bolter shots. And if I had a Multi-Melta, sure I’d have more of a chance to kill the vehicle but what if I’m against a horde Ork list? The Meltas are useless and I sure would be wishing I had that Heavy Bolter back. This of course is just my play style and not something everyone should follow, just an idea worth tossing around while thinking up a list. Some armies simply don’t work like that, but others, Space Marine especially, can do very well this way.
Besides the ability to have unit-based flexibility, you can also craft specially-designed roles for them. Are they going to camp and objective? Give them some heavy fire power. Are they going to rush an objective to clean-up after the Hammer squad swept through? Give them a transport. Are they going to be a sacrificial unit that is shielding a more important squad (such as Heavy Weapons teams or Dark Reapers)? Give them some Close-Combat weapons. The possibilities are endless. You Troops will almost never be the most efficient unit at the job you give them, but they can definitely be incredible strategic assets if you use them in the right way in your lists and in game. They key to Troops selection, just like any unit you will take in an army list, is determining their general purpose. From there you can figure out what wargear to give them and then whether or not you want to make your squad malleable (the can perform wither Task A or Task B) or hardened to one specific purpose. Without Troops, even the strongest list can crumble.
Like always, I’d love to hear your thoughts! What do you guys do when you select Troops?
Subscribe to:
Posts (Atom)
