Hey all,
Warseer's Brimstone died this December 20th and he was a huge part of the Warhammer and Warseer community. He helped me once or twice with thread and forum problems and seemed to be a good bloke. So, if you have ever been a fan of Warseer and the people who made it what it is today stop on by at this thread HERE, and leave a comment if you wish.
I am an ardent atheist and as a result see death in a different way than most. but the recently deceased Kurt Vonnegut once wrote, "So it goes..." I feel that is a great way to express it.
Alex

Friday, December 25, 2009
Thursday, December 24, 2009
Tutorial: How I Paint Space Hulk Terminators

A slew of how-to's and tutorials coming your way this week it seems! First the part one of the Craters and Explosions (with part two later this week) and now this one. I've really been getting stuff done lately, feels good!
Now to the tutorial...
Conventional painting tutorials are generally very bland and monotonous. They attempt to show you the method of painting (which, of course, has its own merit) but most fail to explain why steps were chosen and why things were painted the way they were. Everyone has their own painting style and instead of just showing you how I paint my Space Hulk Terminators, I’ll explain why I chose the paints and techniques I did in an attempt to give you a new point of view when tackling a new mini.
First I must note that this technique was developed to be quick and conducive to bulk painting (thus the inks and washes). Anyways, lets begin!
Step one involved a simple base coat of Mechrite Red slightly watered down. Watering down your paints, especially foundation paints, is incredibly important because otherwise they will be very thick and ruin details on your model. Granted my method doesn’t really make the most of the incredible details on the models, I still urge you to water down your paints slightly. I chose Mechrite because, like all the foundation paints, it provides a very solid base color and only requires one coat.

Step two I used some Brown Caligraphy Ink and washed it over the model. Caligraphy Ink, unlike normal hobby inks, is not water proof. This means if you get water on the model, the ink will begin to run. On that same token, these inks were free because I found them sitting in my basement so I made the most of them. If you have Caligraphy inks you can counter-act the fact that it’s water-proof by mixing in some Matte Medium. I failed to do this on one of the later steps and you’ll be able to see what happens when you don’t. I chose a Brown Ink over, say, Black because Browns tend to deepen Reds more whereas Blacks tend to just dull models down.


Step three involved a drybrush of 50/50 Mechrite Red to Blood Red. This simply serves as a primary highlight.

Step four is a secondary highlight of a straight Blood Red drybrush. At this point the brightness of the Blood Red is meant to accentuate the edges and provide a nice contrast with the browns in the recesses. The armor begins to come together at this point.

Step five is a Baal red Wash. I do this to to not only blend the highlights together but also to emphasis the reds in the model.

Step six is a final highlight and is a very light drybrush of 60/40 Blood Red to Fiery Orange. This final highlight provides a noticeable contrast between itself and not only the recesses but the red of the armor itself. I wanted the models to be noticeable and eye-catching on the Space Hulk board so this highlight serves to do just that.

Now here, step seven, is where I screwed up. I apply Red Caligraphy Ink here in order to deepen the reds and give the model a slight gloss. However, I failed to mix in any Matte Medium and as you will end up seeing in step nine, the red starts to show through a bit.


Here’s where the detailing begins: step eight. I decided to paint any metallic silver parts first as that seemed to be the most prominent color on the model other than red (obviously). I used Boltgun Metal for this, but Chainmail would suffice as well.

Step nine involved base coating any gold or parchment colored surface with Bestial Brown. I decided on Bestial as it is, more or less, a bridge between Snakebite Leather (good for golds) and Graveyard Earth (good for parchments). I decided on using this middle-road color in order to maintain some uniformity over the model and helping to blend the details in a little to make them more subtle (and thus increasing the appeal of the red armor on the table). Next I drybrushed any gold surface over with Shining Gold (for obvious reasons) and then a very light highlight drybrush of 2:1 Shining Gold to Mithril Silver. This just accentuates to extreme edges producing a more vibrant gold color. The Purity Seals were simply painted in Bleached Bone with a highlight of 50/50 Bleached Bone to Skull White. I then used Black to draw small writing on the seals. Finally, over all of the gold and parchment surfaces, I applied a Gryphonne Sepia wash to them. This, like the Bestial Brown undercoat, serves to tie the different details together (and also adds a nice weathering effect to the parchment).

The final step is to highlight the gun with grey (I did a line highlight of Codex Grey with another Fortress Grey highlight just to make the gun ‘pop’ a bit more) and paint the lenses. What I did (for the eyes) was base coat Dark Angels Green, highlight 50/50 Dark Angels to Scorpion Green and finished the highlight off with a straight Scorpion green line in the front of the lens. To top it off I placed a small Skull White dot in the rear of the eye to simulate a reflecting effect that optics would have.


And that’s about it. When I finish my Genestealers (perhaps next week or so) I will post a how-to on them as well!
Wednesday, December 23, 2009
DoW2 Chaos Rising: Great Unclean One!

What a Christmas gift from Relic! A nice short little clip showing the Greater Demon that will be in DoW2: Chaos Rising... the Great Unclean One. Very awesome, even if it is brief. Funny as hell too :D
Monday, December 21, 2009
Tutorial: Craters and Explosions (Part One)
So here is a very simple method to create craters and explosion effects. I do warn you, though, the tissue paper takes FOREVER to dry completely so if you need a piece of terrain immediately, look elsewhere. Otherwise if you have about ten or fifteen minutes to kill in a day and don't mind leaving it to sit for a few days, this method is ace.
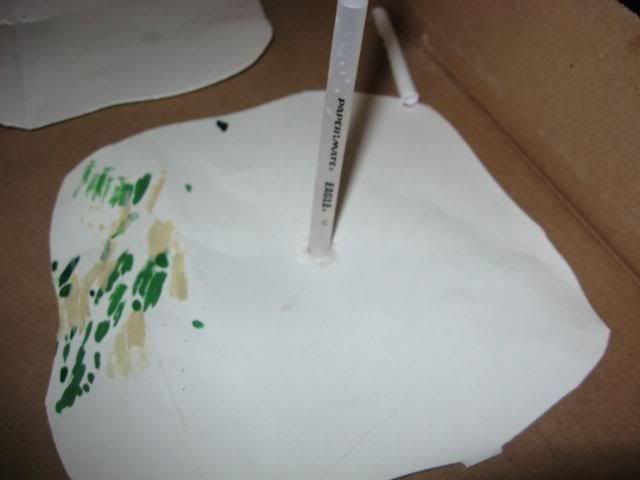
Step one, cut out a frame. It can be anything. I suggest foamcore, but I use posterboard here. You're just using it so you can place the wet paper down and be able to move it around so the material isn't a huge deal.
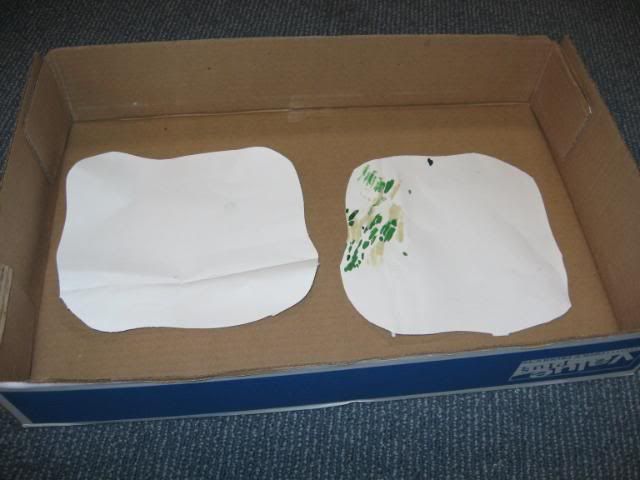
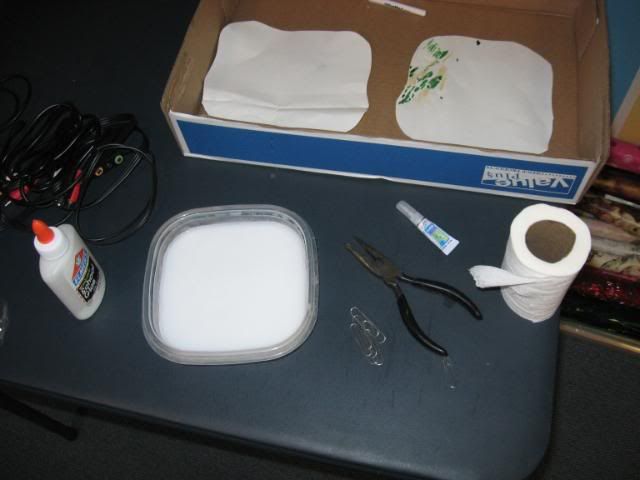
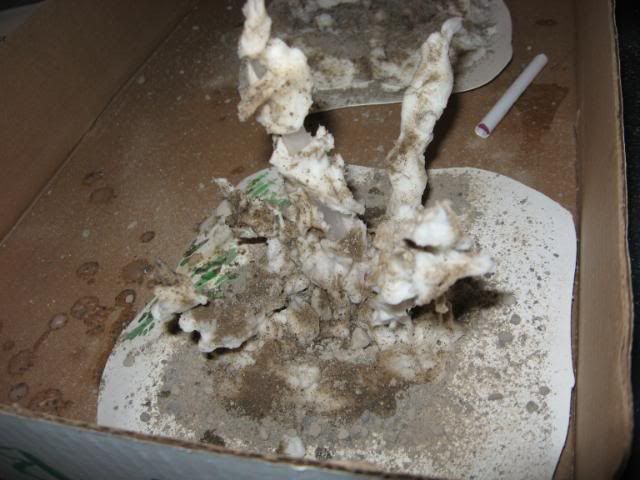
Step two is to mix some Elmer's Glue with water (it should be mostly water. I'd say about at least 5:1 water:glue)and gather your materials. I have my paste mix, some Toilet Paper, some paper clips, an old pen shell and some super glue.
CRATER
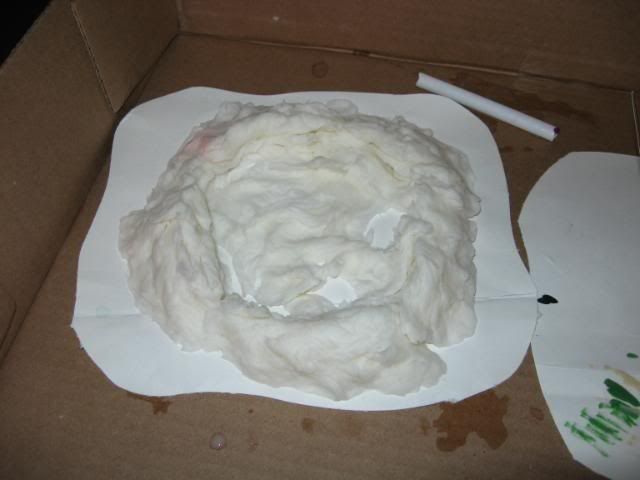
First I'll start with the crater. Simply tear of lines of toilet paper, dip in you paste substance, and create a circle with them on your base. Be sure to slope the outer edges!
Next, if you want, sprinkle on some sand to give it an extra texture.
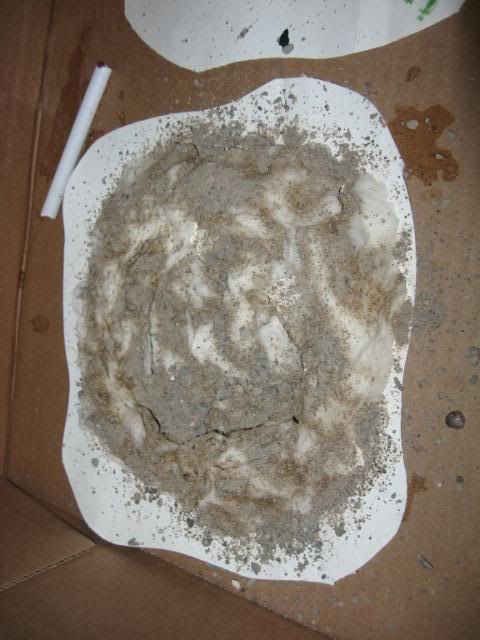
Bam! Done with the crater construction. Now onto...
EXPLOSION
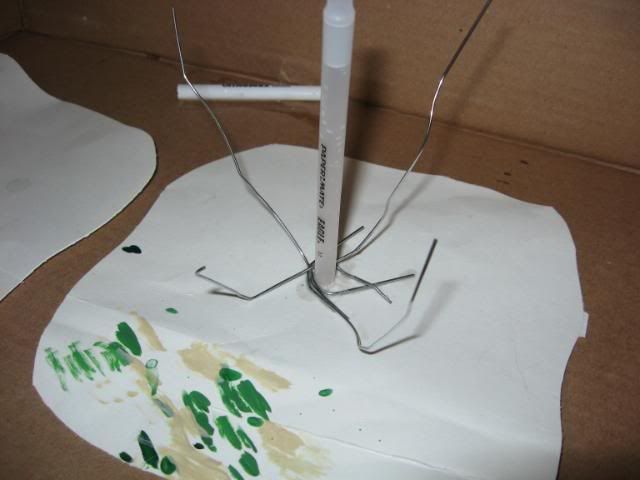
First glue your pen shell upright. This will be the main debris flying from the impact of the exploding shell on the ground.
Next, bend your paperclips and glue them around your pen shell. These will be the debris strands flying outward from the center of explosion.
Now dip small strands of Toilet Paper into your paste substance and begin to wrap it around each debris strand. Make sure you fiddle with it to make it look chaotic (like an explosion) and be sure if you have any loose strands that they point up in the direction of the debris. It is inevitable that some will fall off and some will need to be adjusted, but if you are patient it's not a big deal. The beauty of the long dry time of this paste is that it directly results in a longer work time meaning you can change anything you want for a long time after the original build.
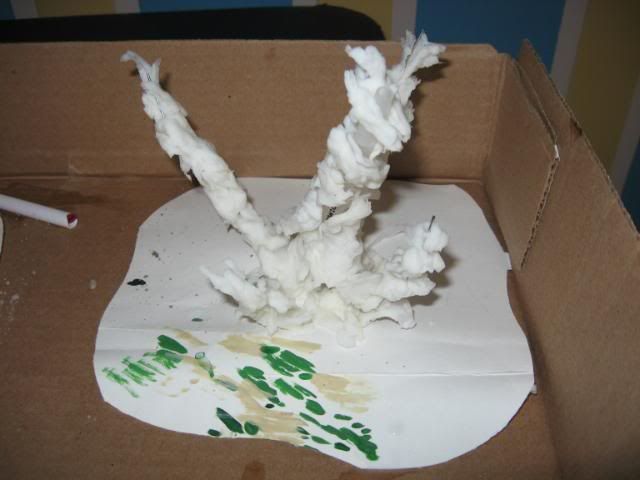
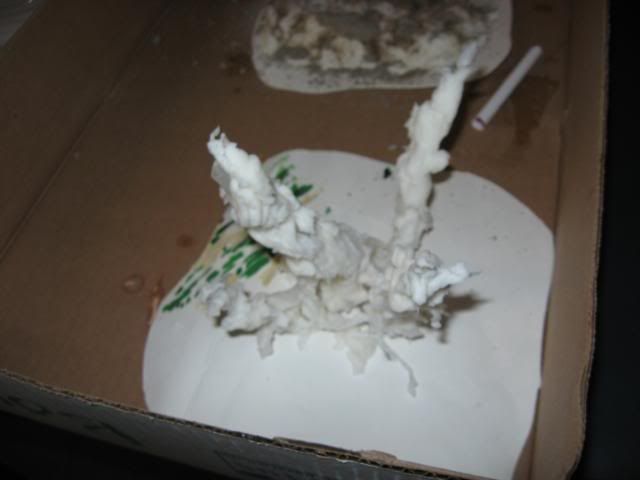
The next step i don't have a picture for, but just like the "Crater" part of this tutorial, create a small crater directly around the debris strands. It will produce an effect as if a shell just hit the ground causing a crater and all the crap flying upwards is the displaced ground.
Now sprinkle sand on it. This will further add to the effect of ground being blown upward.

Part Two can be found here!
Step one, cut out a frame. It can be anything. I suggest foamcore, but I use posterboard here. You're just using it so you can place the wet paper down and be able to move it around so the material isn't a huge deal.

Step two is to mix some Elmer's Glue with water (it should be mostly water. I'd say about at least 5:1 water:glue)and gather your materials. I have my paste mix, some Toilet Paper, some paper clips, an old pen shell and some super glue.

CRATER
First I'll start with the crater. Simply tear of lines of toilet paper, dip in you paste substance, and create a circle with them on your base. Be sure to slope the outer edges!

Next, if you want, sprinkle on some sand to give it an extra texture.

Bam! Done with the crater construction. Now onto...
EXPLOSION
First glue your pen shell upright. This will be the main debris flying from the impact of the exploding shell on the ground.

Next, bend your paperclips and glue them around your pen shell. These will be the debris strands flying outward from the center of explosion.

Now dip small strands of Toilet Paper into your paste substance and begin to wrap it around each debris strand. Make sure you fiddle with it to make it look chaotic (like an explosion) and be sure if you have any loose strands that they point up in the direction of the debris. It is inevitable that some will fall off and some will need to be adjusted, but if you are patient it's not a big deal. The beauty of the long dry time of this paste is that it directly results in a longer work time meaning you can change anything you want for a long time after the original build.


The next step i don't have a picture for, but just like the "Crater" part of this tutorial, create a small crater directly around the debris strands. It will produce an effect as if a shell just hit the ground causing a crater and all the crap flying upwards is the displaced ground.
Now sprinkle sand on it. This will further add to the effect of ground being blown upward.


Part Two can be found here!
Sunday, December 20, 2009
METEORS!!!
So I found an awesome video tutorial on Miniwargaming about crashed Asteroids
and decided to give it a go myself! This is what was produced:
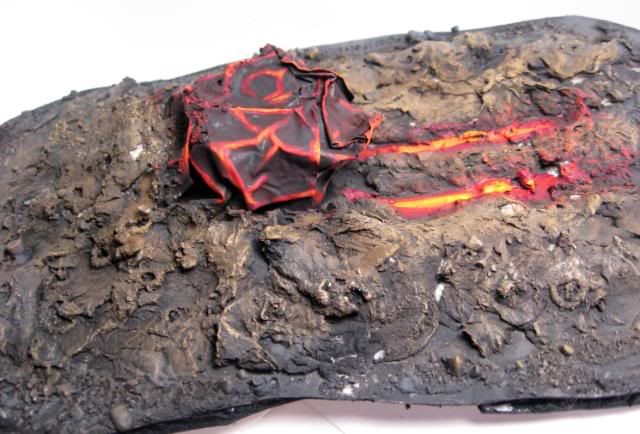
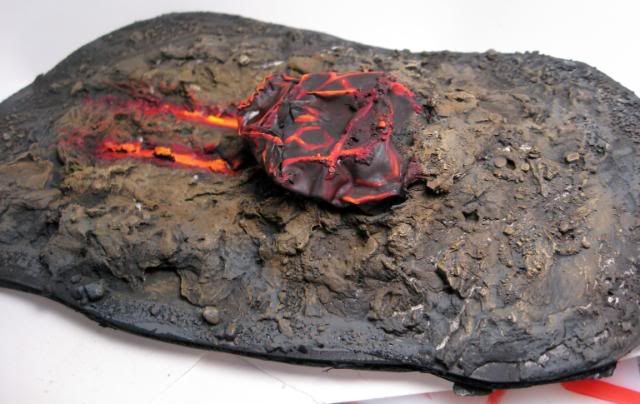
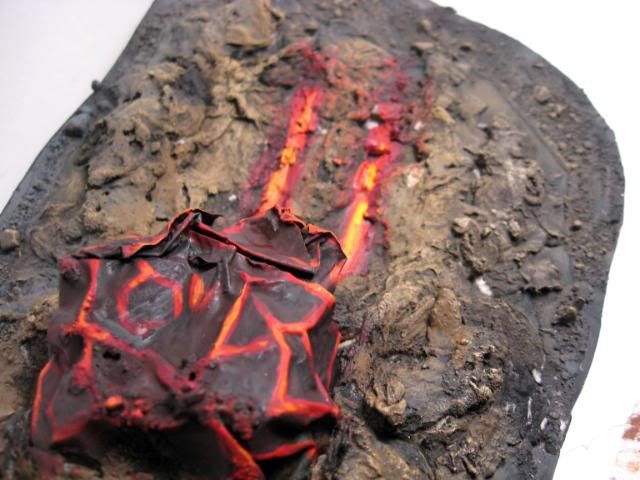
I am honestly so happy with the results that I'm doing a tutorial on craters and explosions using this same method which will be posted up later in the day on Monday with Part Two following whenever the damned stuff dries!
I think it looks cool, what about you guys?
and decided to give it a go myself! This is what was produced:


I am honestly so happy with the results that I'm doing a tutorial on craters and explosions using this same method which will be posted up later in the day on Monday with Part Two following whenever the damned stuff dries!
I think it looks cool, what about you guys?
Thursday, December 17, 2009
Director speaks about Ultramarines movie
I must say, this gets me excited for the prospects of this movie. Like the previous interview with Abnett these guys are trying to stress how important it is to live up to the fan's expectations and deliver a movie that feels authentically 40k . Should be great.
Sunday, December 13, 2009
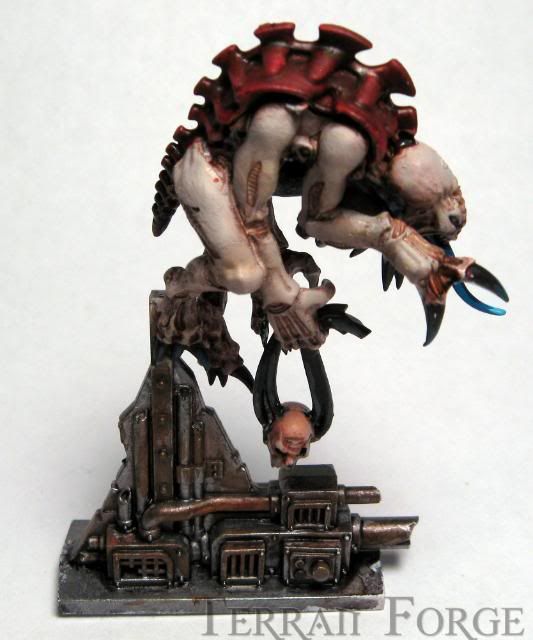
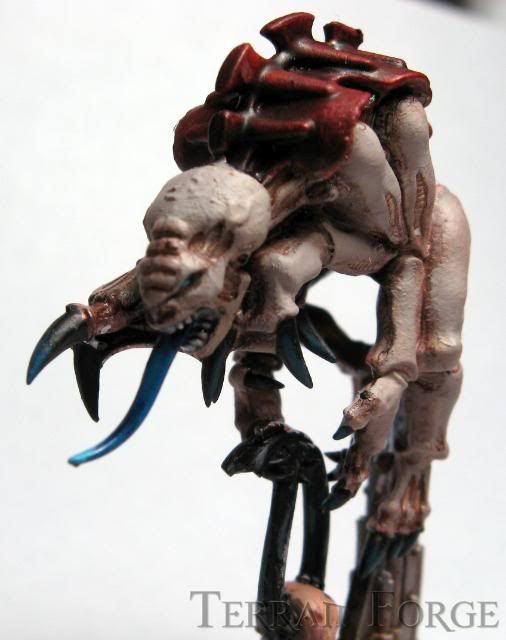
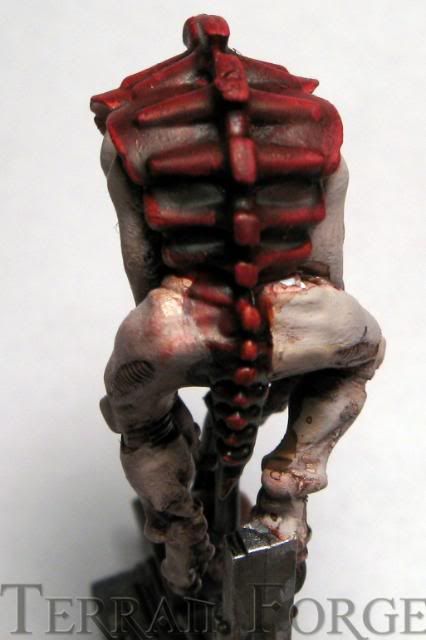
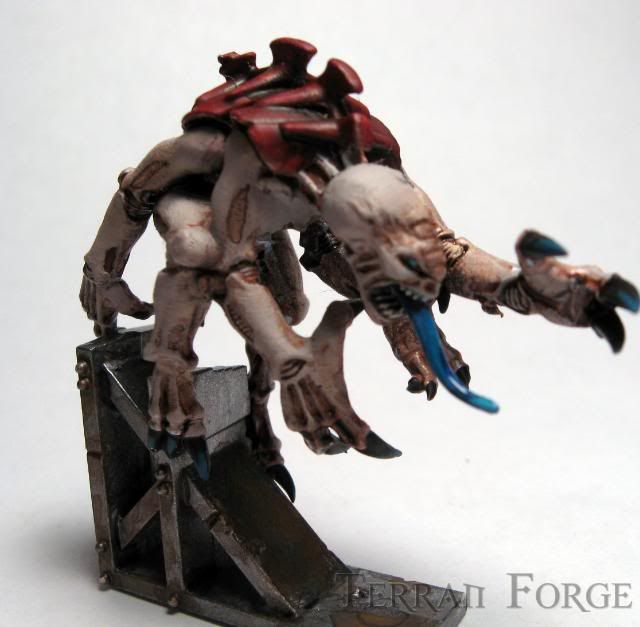
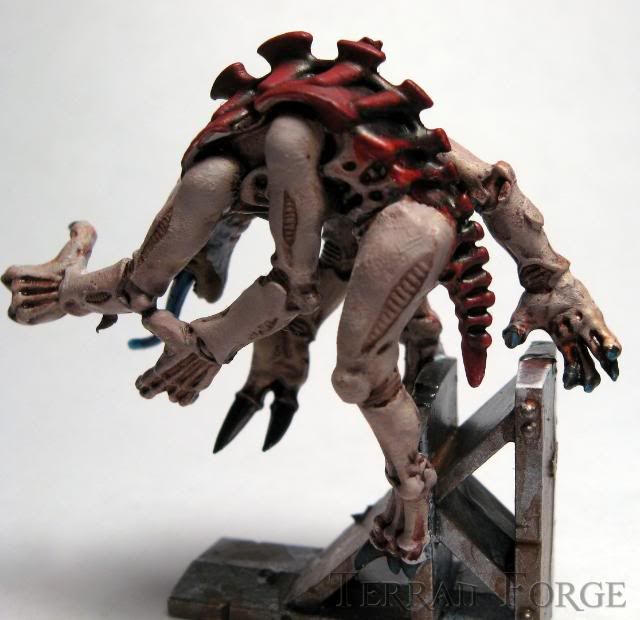
Paintin' Up Space Hulk: Genestealer Test Batch
Finally found some free-time and the motivation to paint some 40k, and two Space Hulk Genestealers are what were produced. In my earlier Space Hulk post I had a Leviathan theme, but the method I had was just not as effective nor fast enough for me to want to continue it. So I started from scratch and came up with this theme which was fast and painless. Normally I'm not into speed-painting or anything, but when it comes down to it, I just need some table-top quality models to make Space Hulk more visually thrilling and that's what I'm doing. All but two of my Terminators already have their armor painted red and it's only a matter of time before i finish them (though I want to put the base coats on the 'Stealers first just when Pat or Alex and I play a game it'll look at least semi-decent). Anyways, here's the pics, let me know what you think!


Monday, December 7, 2009
Astro Mag: Help 'em out!
For those of you not familiar with The Astro Mag, it's a quarterly 40k e-zine started by myself which I lead for five issues until real-life kicked in and I stepped down after Issue 5 in July. Since then there have been a number of hiccups in Issue 6 and Consadine, who is now the head-honcho of the Mag, has decided to wait for a January release in order to shove more articles in and get some Christmas-y stuff in.
So why am I posting this?
Consadine and the guys are looking for more articles, pictures, artwork, comics, whatever to make Issue 6 the most epic of 40k e-zine issues ever! If you have ANY tutorials, editorials, critiques, home-brew rules, cool pictures (especially 40k-related Holiday pictures!), artwork or whatever that you would like published in the mag and read by 10,000+ hobbyists just email them to theastromag@gmail.com! It's really that simple. The idea I started and left behind was to make this a strictly 40k-online-community run magazine. Sure, only a handful of people are responsible for the final product, but all the articles come from various forums and blogs submitted by hobbyists or requested of outstanding hobbyists. The magazine literally happens because of you! If you have any questions about the mag or submitting stuff, you can either drop a comment or email me.
Also, don't forget to check out the Astro Mag's blog to make sure you're up to date on what's happening!
-Kevin
(Side note: I've been working on my Space Hulk stuff again. Hopefully I can get some stuff done before Winter Break so Alex, Pat and I can have a colorful game of Space Hulk!)
Saturday, December 5, 2009
40k/Blogging Desktop Wallpapers
So yesterday I was doodling in my notebook during a two-hour Calc lecture and got a cool idea for some Desktop Wallpapers. Since I'm at home for the weekend (I was dragged home by the girlfriend for a party yesterday) and don't have my codices with me, I decided this would be a nice filler for my Army Mojo stuff until I get the Tau army list up next week.
So first I made a Terran Forge Wallpaper which, admittedly, I'm not too fond of. I'll end up redoing it eventually to make it look less crap. Then I contacted Ron at From the Warp to make sure I could use his logo and, with his blessing, created a cool FtW Wallpaper.
Here they are, and at the top of the page there is a link to "Wallpapers" which will be updated as I create more over time. I am definitely going to do an Astro Mag one and if you guys have any suggestions just let me know!
From the Warp

Terran Forge

Tuesday, December 1, 2009
Mojo List #3: Imperial Guard
 Ok, as I'm getting back into the swing of things at school I'm starting to free up some time for 40k and the first thing is list number three for the Army Mojo series, Imperial Guard! I remember when the codex came out not too long ago, Alex and I poured over it and looked for really cool things you can do. Here is, what I believe, would be a very effective list:
HQ
Company Command Squad - 150
+Carapace Armor, x3 Plasma Guns, Medi-Pack
Elites
Psyker Battle Squad (x10) - 180
+Chimera Transport with Extra Armor
Troops
Infantry Platoon - 230
- Platoon Command Squad (x5 Close-Combat Weapons and Las-Pistols)
- Infantry Squad 1 (Grenade Launcher, Mortar)
- Infantry Squad 2 (Grenade Launcher, Mortar)
- Infantry Squad 3 (Grenade Launcher, Mortar)
Veteran Squad - 185
+Grenadiers, x3 Melta Guns
+Chimera Transport
Veteran Squad - 185
+Grenadiers, x3 Melta Guns
+Chimera Transport
Heavy Support
Leman Russ Battle Tank Squadron (x2) - 320
+x2 Heavy Stubbers
Basilisk - 125
Basilisk - 125
Total = 1500pts
------------------------------------------------------------------
The idea behind the list is to totally neutralize the enemy by pinning and constant morale checks. The Basilisks and Mortars pound on infantry squads to try and pin them or force them to fall back with the Psyker Battle Squad zipping around the field lowering leaderships to make the former squads' tasks easier. The Veterans have a pretty clear objective: tank-hunting and late-game objective grabbing. The Battle Tanks provide some more pie-plate support and can act as barriers to protect the considerably weaker Basilisks. The idea behind the Company Command Squad is to take full advantage of their BS of 4 by providing deadly mid-range fire-power while staying in range of the infantry squads (allowing orders to flow smoothly as well). The Medi-Pack and Carapace give the squad extra survivability as they will have a 4+ armor save plus a FNP save. Finally, the Platoon Command Squad is equipped as a defensive mechanism. In case a deadly close combat squad is closing in on the mortars, they can throw themselves into the fray to protect the troops for at least one more turn which can be invaluable.
So what do you guys think? The lack of mobility in the Infantry Platoon should be sufficiently counter-balanced by the high chance for pinning and the three Chimeras annoying the enemy's front-line. Next up is Tau!
Subscribe to:
Comments (Atom)
